Posts

Good and Bad usage of Lombok
Image
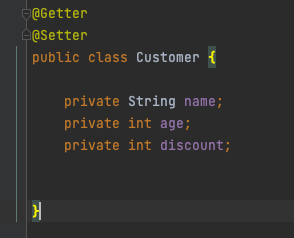
Lombok  is a really nice tool that helps us to write less code and helps us to concentrate more on our actual work. It is more about how you use Lombok in your project. I see good and bad usage of Lombok. What Is Lombok Lombok is a Java library that reduces the boilerplate code in our classes. You add some annotations and Lombok generate codes for you at the compile-time. For example, if you annotate your class from the @Getter annotation then Lombok generates getter methods for all the variables in the class.  How Lombok works First, let us talk about how the compilation process works. There are three main steps in the process Parse and Enter , Annotation Processing , Analyse and Generate .  In  Parse and Ente , source files are read into a syntax tree ( AST ) and each tree is passed to Enter. All the annotation processors are called in the  Annotation Processing  step. If annotation processors generate new source or class files, the compilation process goes into the first steps and

Install JDK on macOS

Image

Why Microservices fail??

Image
Microservices is a buzz word in the tech community for a few years. Some have used it, others want to use it, and some of them are struggling with it. What is the Microservice Architecture? In simple terms, Microservice architecture is an approach to develop a single application as a set of small independent services; they communicate with each using a lightweight mechanism. Most of the time, this lightweight mechanism is HTTP resource API. What are these independent services? They are  Autonomous  services modelled around a  Business Domain . Autonomous These microservices can evolve, change and deploy independently each other. That means we can add new classes, remove and change classes, change the schema of each service without affecting others. These services are loosely coupled. Business Domain Each microservice has its specific domain. For example, if we take Customer Service, it should be able to do all customer-related operations. But this is a simple exa

Four Event Driven Patterns

Image
In this story I would like to explain my understanding of the Event Driven Architecture(EDA) and its patterns. I was assigned to introduce the CQRS pattern in my previous company. That is how I got to know about EDA. EDA comes with a lot of concepts like  Events, Commands, Event sourcing, Aggreate, Evet Reaplay  etc.. . I’ll briefly explain what EDA is and what common patterns are. Event Driven Architecture(EDA) EDA is producing, captureing , processing and persisting of Events . The concept of the EDA is not new. When we talk about EDA, we can identify two types of objects, those are  Event  and  Command.  We cannot do a proper implementation without knowing these two. Command Command is a request to a system to do something and sometimes expects a response for that. Command is very specific and it has a known destination. That means we know what is going to process and who is going to execute our command. Let’s take an Ordering System as an example. When we want to

Failed CQRS implement in Microservice architecture.

Image
CQRS is a useful pattern when having a complex business application where reading and writing have separate requirements. For an example, Write wants to maintain a model in normalised form in a RDB but Read can represent model as document in a Document database. But it is not easy to get head around about CQRS. It comes with  Reads, Writes, Events, Commands, DDD, Event Sourcing, Eventual Consistency . The common way of implementing CQRS is by creating two services communicating with Events. Our CQRS Implementation In order to bring CQRS into our custom framework we used  Axon framework.  At time when we evaluated CQRS frameworks, Axon was the easiest way to work with and had good support for  Spring Boot  framework. This is how Axon was used. CQRS implementation We ended up creating two separate services for Writes and Reads. These two services connected via RabbitMQ. Write Service Write service handles all the Updates. We did not try to convince developers that

Spinnaker Authentication with Keycloak

Image
Spinnaker Authentication with Keycloak In my previous  story  I explained how I deployed Spinnaker onto Kubernetes and enabled public access via ingress. In this short story I’m going to explain how I secure Spinnaker by enabling authentication with Keycloak. For this demo I used Kubernetes running on my Mac and also I’m not going to explain OAuth 2.0, OpenID Connect, all the features of Keycloak. Keycloak Keycloak is an Open Source software for Identity and Access Management. It is developed on the top of  Wildfly   server. It provides support for standard protocols like OpenID Connect, OAuth 2.0, and SAML. Authentication Spinnaker authentication involves three main components. They are, Deck  : Sinnaker UI. That is what you see when you access spinnaker. Gate : API gateway for Spinnaker. All the requests go through the Gate and check whether the request is coming from authenticated user. Identity Provider:  In our case this is Keycloak. Spinnaker Authen

Deploy Spinnaker onto K8S and access via Ingress

Image
Deploy Spinnaker onto K8S and access via Ingress In this small story, I would like to share how I deployed Spinnaker onto Kubernetes and accessed it via ingress. Spinnaker is a multi-cloud continuous delivery platform. It provides two main features. Application management Application deployment Back in my previous company we used Spinnaker to deploy our microservices onto Kubernetes clusters. I did not involve in setting up the Spinnaker but I created pipelines for microservices. But I always wanted to setup Spinnaker by my own. As usual I started reading Spinnaker documentation. According to the documentation the recommended way to setup Spinnaker is a distributed installation onto a Kubernetes cluster. So I wanted to try that. Instructions given by the Spinnaker  documentation , were followed. I installed  Halyard  using below 2 commands, curl -O https://raw.githubusercontent.com/spinnaker/halyard/master/install/macos/InstallHalyard.sh sudo bash